Running Kubernetes locally shouldn’t require a PhD in YAML. Yet most local K8s solutions (Minikube, Kind, k3s) trade away the real learning experience. They abstract everything so heavily that the skills don’t transfer to production.
I wanted something different: a real multi-node cluster with separate VMs, actual networking, and the same kubeadm workflow used in production, but fully automated. No clicking through installers, no SSH-ing between nodes to copy tokens, no manual steps at all.
The result is local-k8s-terraform: one terraform apply and ~7 minutes later, you have a 3-node Kubernetes cluster running on your machine.
Why Not Minikube/Kind/k3s?#
| Feature | local-k8s-terraform | Minikube | Kind | k3s |
|---|---|---|---|---|
| Real VMs | ✅ Separate QEMU VMs | Single VM or Docker | Docker containers | Lightweight binary |
| Multi-node networking | ✅ Libvirt NAT + static IPs | Limited | Docker network | Varies |
| Uses kubeadm | ✅ Same as production | Abstracted | No | No |
| Cloud-init provisioning | ✅ Mirrors cloud workflow | No | No | No |
| Full Calico CNI | ✅ Tigera Operator | Simplified | Kindnet | Flannel |
| Practice for CKA/CKAD | ✅ Real cluster topology | Partial | Partial | Partial |
The point isn’t that Minikube or Kind are bad; they’re great for quick testing. But if you’re preparing for production work, CKA/CKAD, or want to understand how clusters actually boot, you need real VMs with real networking.
Architecture#
The cluster consists of 3 VMs on a libvirt NAT network with static IPs:
graph LR
    TF["Terraform\n(Libvirt v0.9.8)"]

    subgraph CLUSTER["k8s-net · 192.168.100.0/24"]
        M["k8s-master\n.100.10 · 2GB · 2vCPU"]
        W1["k8s-worker-1\n.100.11 · 1GB · 1vCPU"]
        W2["k8s-worker-2\n.100.12 · 1GB · 1vCPU"]
    end

    KC["~/.kube/config"]

    TF -- "1. provisions" --> M
    TF -- "1. provisions" --> W1
    TF -- "1. provisions" --> W2
    M -. "2. join token\nHTTP :8000" .-> W1
    M -. "2. join token\nHTTP :8000" .-> W2
    M -- "3. kubeconfig" --> KC
Resource Allocation#
| Node | RAM | vCPU | Disk | IP |
|---|---|---|---|---|
| k8s-master | 2 GB | 2 | 20 GB | 192.168.100.10 |
| k8s-worker-1 | 1 GB | 1 | 15 GB | 192.168.100.11 |
| k8s-worker-2 | 1 GB | 1 | 15 GB | 192.168.100.12 |
| Total | 4 GB | 4 | 50 GB |
All values are configurable in terraform.tfvars.
The Full Automation Flow#
After terraform apply, everything happens without any manual steps. Here’s exactly what the automation does:
sequenceDiagram
    participant H as Host (You)
    participant TF as Terraform
    participant M as k8s-master
    participant W1 as k8s-worker-1
    participant W2 as k8s-worker-2

    H->>TF: terraform apply
    TF->>TF: Create NAT network (192.168.100.0/24)
    TF->>M: Create VM + cloud-init ISO
    TF->>W1: Create VM + cloud-init ISO
    TF->>W2: Create VM + cloud-init ISO

    Note over M: cloud-init starts
    M->>M: Disable swap, SELinux, firewalld
    M->>M: Install containerd + kubeadm (dnf/apt)
    M->>M: kubeadm init (control plane)
    M->>M: Install Calico CNI (Tigera Operator)
    M->>M: Generate join token
    M->>M: Start HTTP server on :8000

    Note over W1,W2: cloud-init starts (parallel)
    W1->>W1: Disable swap, install containerd + kubeadm
    W2->>W2: Disable swap, install containerd + kubeadm
    W1->>M: curl http://192.168.100.10:8000/join-command.sh
    W2->>M: curl http://192.168.100.10:8000/join-command.sh
    M-->>W1: kubeadm join 192.168.100.10:6443 --token ...
    M-->>W2: kubeadm join 192.168.100.10:6443 --token ...
    W1->>M: kubeadm join
    W2->>M: kubeadm join

    H->>H: ./scripts/get-kubeconfig.sh
    H->>H: kubectl get nodes → 3 nodes Ready ✅
The entire process takes about 5-7 minutes depending on your internet speed (for pulling container images).
How Workers Get the Join Token (No SSH Required)#
This was the trickiest design problem. In a typical kubeadm setup, you SSH into the master, run kubeadm token create --print-join-command, copy the output, SSH into each worker, and paste it. That’s manual and doesn’t scale.
My solution: the master runs a Python HTTP server as a systemd service.
# Systemd service on the master (created by cloud-init)
- path: /etc/systemd/system/join-token-server.service
  content: |
    [Unit]
    Description=Serve K8s join token via HTTP
    After=network.target

    [Service]
    Type=simple
    DynamicUser=yes
    ProtectHome=yes
    WorkingDirectory=/srv/k8s-join
    ExecStart=/usr/bin/python3 -m http.server 8000 --bind 192.168.100.10
    Restart=on-failure
    RestartSec=5

    [Install]
    WantedBy=multi-user.target
After kubeadm init completes on the master, the join command is saved to /srv/k8s-join/join-command.sh and served via HTTP on port 8000.
The folder matters. http.server hands out every file in its working directory, not just the one you meant. My first version served /home/km, and that folder also holds a copy of the admin kubeconfig, so anything that could reach port 8000 could download full control of the cluster. Now the join command sits in a folder of its own. DynamicUser=yes runs the server as a throwaway user, and ProtectHome=yes hides /home from it. The token itself is created with --ttl 1h, so it stops working an hour after the cluster comes up.
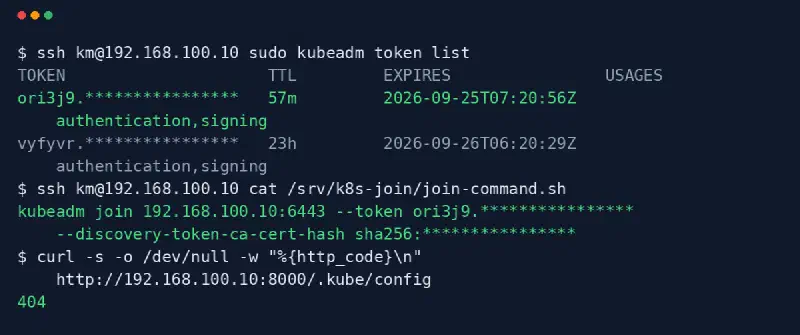
Workers poll this URL in a retry loop:
# Worker cloud-init runcmd (simplified)
JOIN_URL="http://192.168.100.10:8000/join-command.sh"

while true; do
  JOIN_CMD=$(curl -s "$JOIN_URL" 2>/dev/null)
  if [ -n "$JOIN_CMD" ]; then
    echo "[worker] Got join command from master!"
    sudo bash -c "$JOIN_CMD"
    break
  fi
  echo "[worker] Master not ready. Retrying in 10s..."
  sleep 10
done
No SSH keys between nodes, no coordination service. Just HTTP and a short-lived token.
Disk Space Efficiency: qcow2 Backing Store#
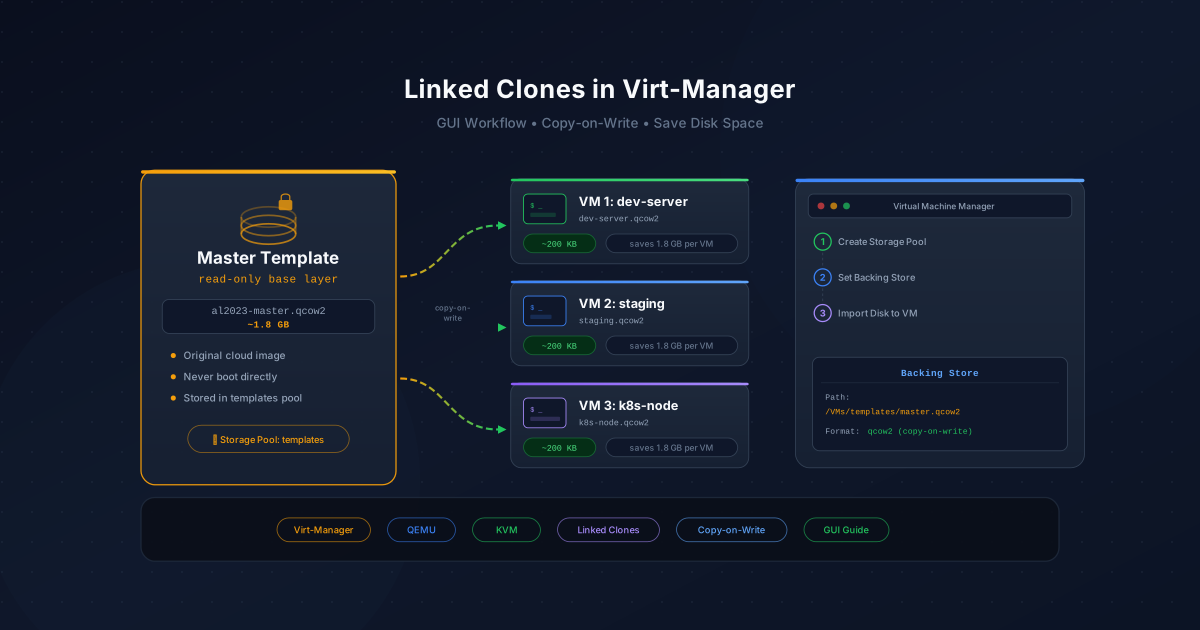
Instead of duplicating the full cloud image for each VM (which would be 3× the image size), I use qcow2 backing stores (also called thin clones or linked clones).
graph TD
    BASE["Base Cloud Image
(read-only)"] --> M_OVERLAY["Master Overlay
(CoW diff only)
~few MB initially"]
    BASE --> W1_OVERLAY["Worker-1 Overlay
(CoW diff only)
~few MB initially"]
    BASE --> W2_OVERLAY["Worker-2 Overlay
(CoW diff only)
~few MB initially"]

    style BASE fill:#3b82f6,color:white,stroke:#1e40af;
    style M_OVERLAY fill:#22c55e,color:black,stroke:#166534;
    style W1_OVERLAY fill:#22c55e,color:black,stroke:#166534;
    style W2_OVERLAY fill:#22c55e,color:black,stroke:#166534;
The base image is uploaded once to the libvirt storage pool. Each VM’s disk is a thin overlay that only stores the diffs: writes go to the overlay, reads fall through to the base. Three VMs share one base image.
In Terraform, this is configured with the backing_store attribute:
# Base cloud image (shared, read-only)
resource "libvirt_volume" "base" {
  name = "k8s-base.qcow2"
  pool = "default"

  target = { format = { type = "qcow2" } }
  create = { content = { url = var.base_image_path } }
}

# Master disk (thin overlay on base)
resource "libvirt_volume" "master" {
  name     = "k8s-master.qcow2"
  pool     = "default"
  capacity = var.master_disk_size

  backing_store = {
    path   = libvirt_volume.base.path
    format = { type = "qcow2" }
  }

  target = { format = { type = "qcow2" } }
}
I wrote a separate guide on this technique: How to Create Linked Clones in Virt-Manager.
Calico CNI via Tigera Operator#
In v1.0, I installed Calico with a raw manifest kubectl apply:
# v1.0: raw manifest (simple but limited)
kubectl apply -f https://raw.githubusercontent.com/.../v3.27.0/manifests/calico.yaml
In v2.0, I switched to the Tigera Operator, which is the production-recommended approach:
# v2.0: Tigera Operator (lifecycle management)
kubectl create -f https://raw.githubusercontent.com/.../v3.32.1/manifests/tigera-operator.yaml
kubectl apply -f /root/calico-installation.yaml
The operator manages Calico’s lifecycle (upgrades, configuration changes, health monitoring) through a Kubernetes custom resource:
apiVersion: operator.tigera.io/v1
kind: Installation
metadata:
  name: default
spec:
  cni:
    type: Calico
  calicoNetwork:
    ipPools:
    - blockSize: 26
      cidr: "10.244.0.0/16"
      encapsulation: VXLANCrossSubnet
      natOutgoing: Enabled
      nodeSelector: all()
The CRD Race Condition#
There’s a subtle gotcha when automating this in cloud-init: the Tigera Operator creates CRDs (Custom Resource Definitions) asynchronously. If you kubectl apply the Installation resource before the CRD is registered, it fails with no matches for kind "Installation".
The fix is a retry loop that waits for the CRD:
# Wait for the Installation CRD before applying
for i in $(seq 1 30); do
  if kubectl get crd installations.operator.tigera.io > /dev/null 2>&1; then
    break
  fi
  echo "Waiting for Tigera CRDs... attempt $i/30"
  sleep 5
done
kubectl apply -f /root/calico-installation.yaml
Nodes Show NotReady for ~5 Minutes#
After terraform apply completes and you grab the kubeconfig, you’ll see this:
NAME           STATUS     ROLES           AGE   VERSION
k8s-master     NotReady   control-plane   14s   v1.36.3
k8s-worker-1   NotReady   <none>          21s   v1.36.3
k8s-worker-2   NotReady   <none>          15s   v1.36.3
This is normal. Nodes stay NotReady until the Calico CNI pods finish pulling images and reach Running state. After ~5-7 minutes:
NAME           STATUS   ROLES           AGE     VERSION
k8s-master     Ready    control-plane   6m44s   v1.36.3
k8s-worker-1   Ready    <none>          6m18s   v1.36.3
k8s-worker-2   Ready    <none>          6m12s   v1.36.3
You can monitor Calico’s progress with:
kubectl get pods -n calico-system -w
kubectl get pods -n tigera-operator -w
The Libvirt Provider Rewrite: 0.8 → 0.9#
This is the most interesting technical story in the v2.0 upgrade. The Terraform libvirt provider (dmacvicar/libvirt) went through a complete rewrite between v0.8.x and v0.9.x, and the changes are dramatic.
Why the Rewrite Happened#
Terraform has two ways to build providers:
- SDKv2 (legacy): Flat attribute schemas. Every resource property is a top-level key. Simple, but can’t represent nested XML structures cleanly.
- Plugin Framework (modern): Supports deeply nested attribute blocks. Maps naturally to hierarchical data like libvirt’s XML domain definitions.
The libvirt provider manages VMs defined by libvirt XML, a deeply nested structure with <devices>, <disk>, <source>, <target> elements. SDKv2’s flat schema was a poor fit. The rewrite to Plugin Framework made the Terraform resources mirror libvirt’s XML 1:1.
What Changed: Side-by-Side#
Here’s how the same VM definition looks in both versions:
Network definition:
# v1.0 (Provider 0.8.x, SDKv2)
resource "libvirt_network" "k8s" {
  name      = "k8s-net"
  mode      = "nat"              # flat string attribute
  domain    = "k8s.local"        # flat string
  addresses = ["192.168.100.0/24"]  # flat list

  dhcp { enabled = false }       # block syntax
  dns  { enabled = true }
}

# v2.0 (Provider 0.9.x, Plugin Framework)
resource "libvirt_network" "k8s" {
  name = "k8s-net"

  forward = { mode = "nat" }    # nested object with = assignment
  domain  = {                   # nested object
    name       = "k8s.local"
    local_only = "yes"
  }

  ips = [{                      # list of nested objects
    address = "192.168.100.1"
    netmask = "255.255.255.0"
  }]

  dns = { enable = "yes" }
}
Volume definition:
# v1.0 (Provider 0.8.x)
resource "libvirt_volume" "master" {
  name           = "k8s-master.qcow2"
  pool           = "default"
  base_volume_id = libvirt_volume.base.id  # flat reference
  size           = 21474836480
  format         = "qcow2"                # flat string
}

# v2.0 (Provider 0.9.x)
resource "libvirt_volume" "master" {
  name     = "k8s-master.qcow2"
  pool     = "default"
  capacity = 21474836480

  backing_store = {                        # nested object
    path   = libvirt_volume.base.path
    format = { type = "qcow2" }
  }
  target = { format = { type = "qcow2" } }
}
VM (domain) definition:
# v1.0 (Provider 0.8.x): block syntax, flat attributes
resource "libvirt_domain" "master" {
  name   = "k8s-master"
  memory = 2048
  vcpu   = 2

  cloudinit = libvirt_cloudinit_disk.master.id

  disk {
    volume_id = libvirt_volume.master.id
  }

  network_interface {
    network_id = libvirt_network.k8s.id
    addresses  = ["192.168.100.10"]
  }

  console {
    type        = "pty"
    target_type = "serial"
    target_port = "0"
  }
}

# v2.0 (Provider 0.9.x): nested objects with = assignment
resource "libvirt_domain" "master" {
  name        = "k8s-master"
  memory      = 2048
  memory_unit = "MiB"
  vcpu        = 2
  type        = "kvm"
  running     = true

  cpu = { mode = "host-passthrough" }

  os = {
    type      = "hvm"
    type_arch = "x86_64"
    boot_devices = [{ dev = "hd" }]
  }

  devices = {
    disks = [{
      device = "disk"
      driver = { name = "qemu", type = "qcow2" }
      source = { file = { file = libvirt_volume.master.path } }
      target = { dev = "vda", bus = "virtio" }
    }]

    interfaces = [{
      source = { network = { network = libvirt_network.k8s.name } }
      model  = { type = "virtio" }
    }]

    consoles = [{
      target = { type = "serial", port = 0 }
    }]
  }
}
The 0.9.x version is more verbose, but it maps directly to the libvirt XML schema. If you’ve ever written raw libvirt XML, the Terraform code now looks immediately familiar. Every nested block corresponds to an XML element.
The Breaking Change Problem#
The issue with this rewrite is Terraform state. When you provision infrastructure, Terraform saves the resource attributes in a .tfstate file. The state file from v0.8.x contains flat attributes like format = "qcow2" and base_volume_id = "...". The v0.9.x provider expects nested attributes like target.format.type and backing_store.path.
graph LR
    A["v0.8.x State
format = 'qcow2'
base_volume_id = '...'
size = 21474836480"] -->|"Upgrade provider"| B{"v0.9.x Provider
tries to read state"}
    B -->|"Can't find
target.format.type"| C["❌ Error:
schema mismatch"]

    D["terraform destroy
(clean slate)"] --> E["v0.9.x State
target.format.type = 'qcow2'
backing_store.path = '...'
capacity = 21474836480"]
    E --> F["✅ Works"]

    style C fill:#ef4444,color:white,stroke:#991b1b;
    style F fill:#22c55e,color:black,stroke:#166534;
For this local lab project, the solution is simple: terraform destroy your old cluster, then terraform apply with the new code. No data loss concerns, as these are ephemeral learning VMs.
What About Production?#
If you’re wondering “doesn’t this mean production infrastructure gets destroyed during provider upgrades?”, the answer is no. Here’s why:
Major cloud providers (AWS, GCP, Azure) include automatic state migration in their provider code. When you upgrade the AWS provider, it silently converts old state formats to new ones.
terraform planshows “no changes.”The libvirt provider is a community project with a smaller team. The 0.8→0.9 rewrite was so fundamental that full state migration wasn’t practical, as every resource attribute changed structure.
In production, you’d never blindly upgrade a provider across a major version. You’d:
- Test the upgrade on a staging environment first
- Use
terraform state rm+terraform importto re-import resources if migration isn’t automatic - Or run the old and new infrastructure in parallel (blue-green) and migrate traffic
The key insight: Terraform providers are just drivers. Changing the driver doesn’t delete the actual infrastructure. The VMs/networks/resources exist independently in libvirt. The state file is just Terraform’s internal bookkeeping.
The Full Version Changelog: v1.0 → v2.0#
Here’s every component that changed between the two versions:
| Component | v1.0 | v2.0 | Why |
|---|---|---|---|
| Terraform Libvirt Provider | ~> 0.8.0 (SDKv2) | ~> 0.9.8 (Plugin Framework) | 1:1 mapping to libvirt XML schema |
| Kubernetes | v1.30 | v1.36 | Latest stable release |
| kubeadm API | v1beta3 | v1beta4 | Current config format, v1beta3 is deprecated |
| Calico CNI | v3.27.0 (raw manifest) | v3.32.1 (Tigera Operator) | Production-recommended lifecycle management |
| containerd config | version 2 | version 3 | Required for containerd 2.x |
| Pause container | registry.k8s.io/pause:3.9 | registry.k8s.io/pause:3.11 | Matches K8s 1.36 default |
| Fedora Cloud | 40 | 44 | Latest stable release |
| Ubuntu Cloud | 22.04 (Jammy) | 24.04 (Noble) | LTS upgrade |
containerd Config: v2 → v3#
This is a subtle but important change. containerd 2.x requires config version 3, and the CRI plugin paths changed:
# v1.0: containerd config version 2
version = 2
[plugins."io.containerd.grpc.v1.cri"]
  sandbox_image = "registry.k8s.io/pause:3.9"
  [plugins."io.containerd.grpc.v1.cri".containerd.runtimes.runc.options]
    SystemdCgroup = true

# v2.0: containerd config version 3
version = 3
[plugins."io.containerd.cri.v1.images"]
  sandbox_image = "registry.k8s.io/pause:3.11"
[plugins."io.containerd.cri.v1.runtime".containerd.runtimes.runc]
  runtime_type = "io.containerd.runc.v2"
  [plugins."io.containerd.cri.v1.runtime".containerd.runtimes.runc.options]
    SystemdCgroup = true
The plugin path changed from io.containerd.grpc.v1.cri (the old gRPC-based CRI plugin) to io.containerd.cri.v1.images and io.containerd.cri.v1.runtime (the new modular CRI implementation). If you use the old paths with containerd 2.x, it silently ignores your config and uses defaults, which means the wrong pause image and no systemd cgroup driver.
kubeadm API: v1beta3 → v1beta4#
Kubernetes 1.36 still accepts v1beta3 but deprecates it, so v2.0 moves to v1beta4:
# v1.0
apiVersion: kubeadm.k8s.io/v1beta3

# v2.0
apiVersion: kubeadm.k8s.io/v1beta4
If you use v1beta3 with kubeadm 1.36, you’ll get a deprecation warning and it may fail in future versions. The config structure is mostly the same between beta3 and beta4 for basic cluster setups.
Getting Fedora 44 to boot in v2.1#
setup.sh has offered Fedora 44 since v2.0, but no Fedora cluster had ever come up. I found out while testing the join token fix on my own Fedora desktop. Five bugs stood in the way, and each one hid behind the one before it. Every fix walked straight into the next failure.
The image download returned 404
bug 1
setup.shasked forFedora-Cloud-Base-Generic.x86_64-44-1.7.qcow2. The real file isFedora-Cloud-Base-Generic-44-1.7.x86_64.qcow2, with the version before the architecture, so every mirror answered 404.That alone would be a one-line fix, but
wget -Ocreates its output file even when the download fails. The failed run left a 146-byte error page named like the image. The next run saw the file, skipped the download and built VMs from it. The script now downloads to a.partfile and renames it only after wget succeeds.The VMs booted with no IP address
bug 2
The network config found the network card with
match: name: en*. Netplan on Ubuntu understands that pattern. On Fedora, cloud-init writes a NetworkManager profile instead, and that renderer drops the pattern. It pinned the profile tointerface-name=nic0, a card that doesn’t exist. The real card wasenp0s3, which fell back to DHCP.k8s-nethas DHCP turned off, so the VM never got an address.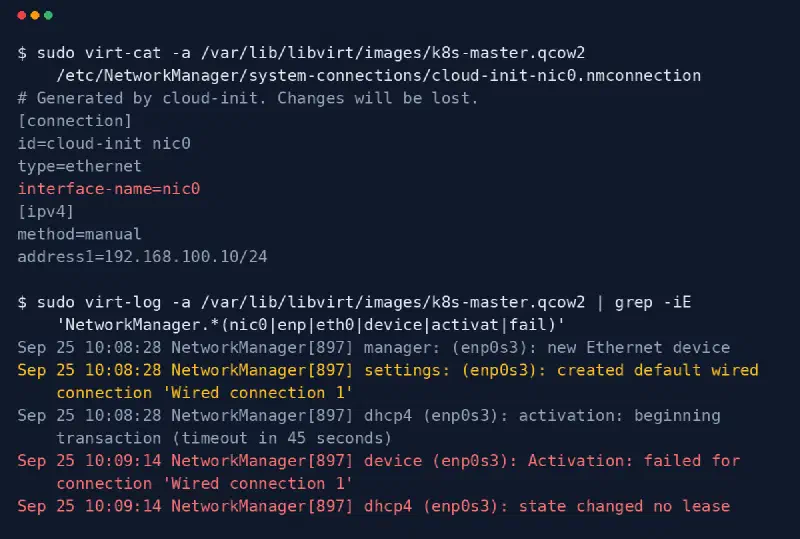
Read from the powered-off master’s disk with virt-cat and virt-log. The static IP went into a profile for nic0. The real card, enp0s3, tried DHCP and gave up. Now Terraform gives each VM a fixed MAC address built from its IP, and the network config matches the card by that MAC.
192.168.100.11gets52:54:00:a8:64:0b. The MAC only has to be unique on thek8s-netbridge, and NAT keeps it from ever leaving the host. It also keeps working if a future image renames the card.kubeadm was never installed
bug 3
With networking fixed, the master came up and cloud-init finished, but
~/.kubestayed empty.rpm -q kubeadmsaid it wasn’t installed. Fedora 44 ships dnf5, and dnf5 dropped the--disableexcludesflag that the official Kubernetes install docs use.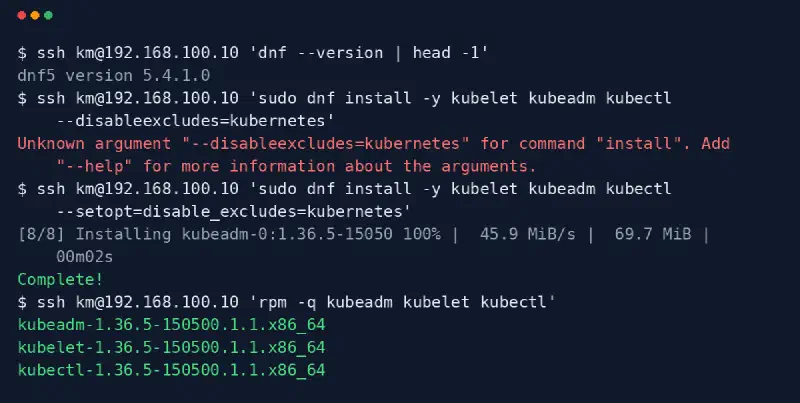
dnf5 rejects the old flag outright. The --setoptform installs all three packages, and the repo’s exclude line still stops a routine dnf upgrade from touching them.Why did cloud-init finish as if nothing failed?
runcmdruns as one shell script, and cloud-init only reports the exit code of its last command. A failed install in the middle doesn’t count. On Fedora theruncmdoutput goes to the journal, notcloud-init-output.log, so the error didn’t show up where I looked first.kubelet refused to start
bug 4
kubeadm installed, then
kubeadm inittimed out atwait-control-plane. kubelet was crash-looping because swap was on, even though cloud-init runsswapoff -a.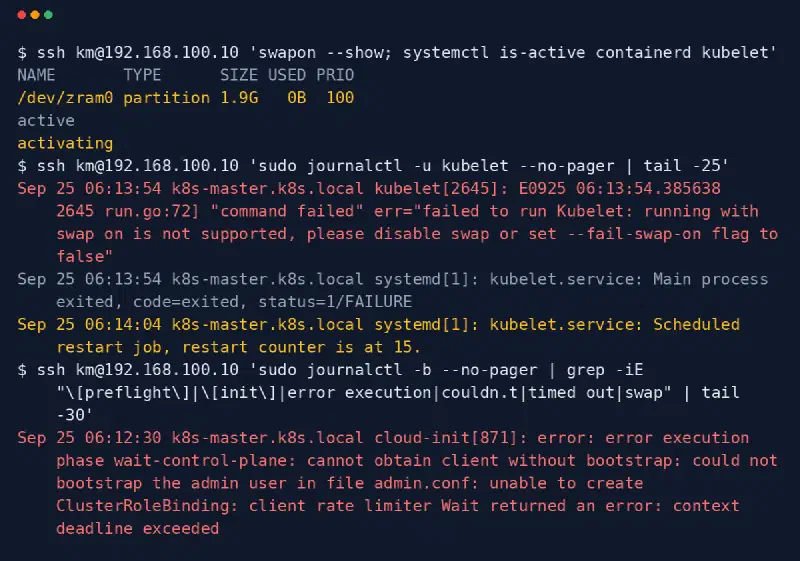
The swap is /dev/zram0, compressed RAM rather than a disk file. kubelet had restarted 15 times by the time I looked, and kubeadm init had already given up. Fedora turns on zram swap by default, and a systemd generator recreates its swap unit on every boot and every
daemon-reload.swapoff -aturns it off until the next reload. cloud-init now writes an empty/etc/systemd/zram-generator.conf, which tells the generator to make nothing, then runssystemctl daemon-reloadandswapoff -a.Nodes got long names
bug 5
The cluster finally came up, but Fedora nodes registered as
k8s-master.k8s.localwhile Ubuntu nodes were plaink8s-master. cloud-init on the Red Hat family of distros sets the FQDN as the hostname by default, and kubelet names the node after the hostname.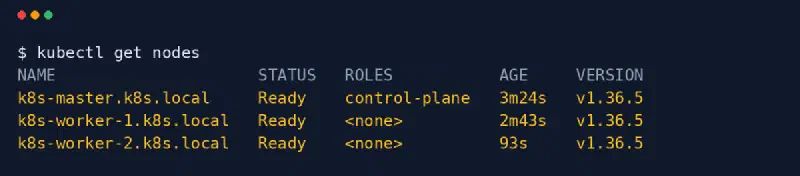
Before. A working cluster, but with different node names on Fedora and Ubuntu. One line in the Fedora cloud-init fixes it,
prefer_fqdn_over_hostname: false. The FQDN still resolves through/etc/hosts, so nothing that needs it breaks.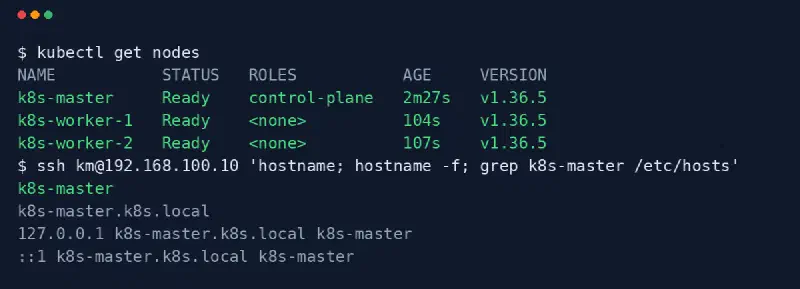
After. Short node names like on Ubuntu. hostname -f still gives the full name.
What changed from v2.0 to v2.1#
| Area | v2.0 | v2.1 |
|---|---|---|
| Join server | Served all of /home/km, admin kubeconfig included | Serves only /srv/k8s-join, as a throwaway user |
| Served join token | Valid for 24 hours | Expires after 1 hour |
| Control plane version | x.y.0 | The installed patch, like v1.36.5 |
k8s_version check | Bad values failed inside the VM | Bad values fail at terraform plan |
| Network card match | en* name pattern | Fixed MAC built from each node’s IP |
| Fedora 44 | Never booted | 3 nodes Ready |
| Fedora node names | k8s-master.k8s.local | k8s-master, same as Ubuntu |
The full list with commit links is in the v2.1 release notes and the repo’s CHANGELOG.md.
Quick Start#
# Clone
git clone https://github.com/khadirullah/local-k8s-terraform.git
cd local-k8s-terraform

# Setup (downloads cloud image + inits Terraform)
chmod +x scripts/*.sh
./scripts/setup.sh    # Select: Fedora (1) or Ubuntu (2)

# Provision
cd terraform
terraform apply -auto-approve

# Get kubeconfig (~5 min later)
cd ..
./scripts/get-kubeconfig.sh

# Verify
export KUBECONFIG=~/.kube/config-local-k8s
kubectl get nodes../scripts/destroy.sh from terraform/, then run ./scripts/setup.sh from the repo root and terraform apply again. The README’s Upgrading from v2.0 section has the full steps.What You Can Do After Setup#
Once your cluster is running, you can:
- Practice with Deployments, Services, Ingress, RBAC, NetworkPolicies on a real multi-node cluster
- Test ArgoCD GitOps workflows locally
- Simulate node failures by stopping a VM in virt-manager and watching Kubernetes reschedule pods
- Prepare for CKA/CKAD exams with a cluster that matches the exam environment
Related Posts#
- How to Create Linked Clones in Virt-Manager: The qcow2 backing store technique used by this project
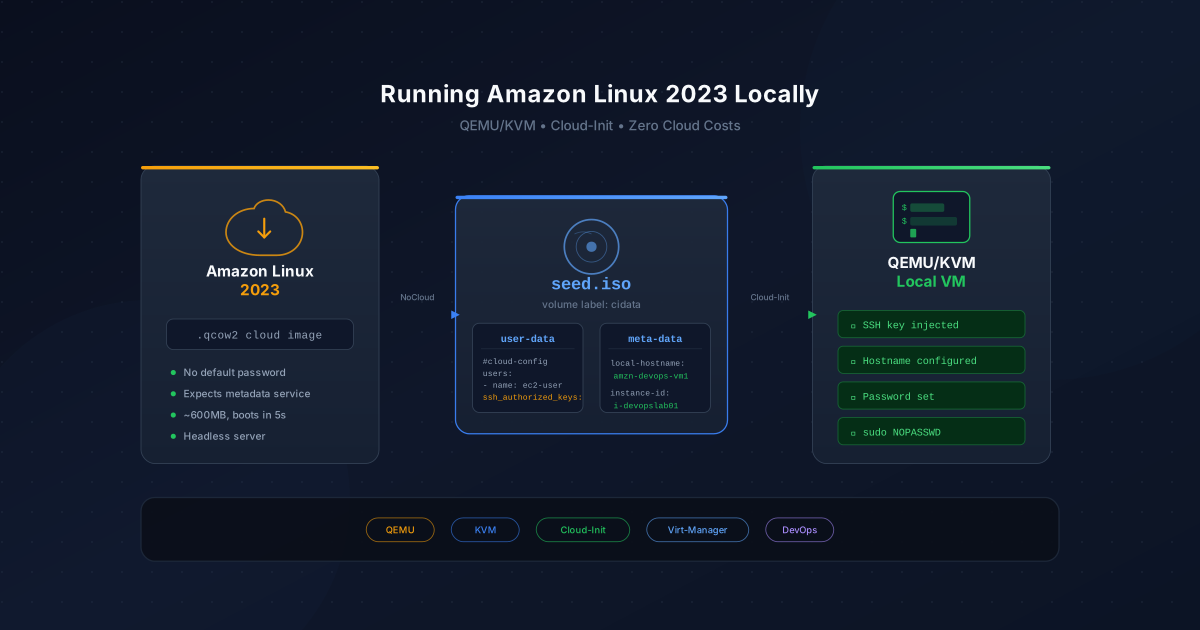
- How to Run Amazon Linux 2023 Locally with QEMU/KVM: Running cloud images locally with Cloud-Init, the foundational concept behind this project
References & Documentation#
- local-k8s-terraform on GitHub: Full source code and README
- Terraform Libvirt Provider: The community provider for QEMU/KVM
- kubeadm v1beta4 Reference: Configuration API for Kubernetes 1.36
- Calico Tigera Operator Install Guide: Production-recommended Calico installation
- containerd 2.x Configuration: Plugin path changes in containerd 2.x
- Libvirt Domain XML Format: The XML schema that the 0.9.x provider maps to